Scanned guide for assembling a barrel into a drum body. Source is unknown.
Making the Body (Do) of a Taiko
Rim Insert Installation
Determine the dimensions of the drum. A good proportion is cut the length of the drum to 125% of the diameter of the head. Remember that the diameter of the head increases as you cut off . more from the end.
Prepare the insert 1-2 days in advance. Glue/laminate pieces of plywood to obtain 2 - 2½” thickness and large enough to cover the cut opening.
Cut off the ends of the barrel with a Skilsaw. Adjust the angle of the blade to parallel with the opening. Move or remove bands only as necessary. Replace any bands that will fit on the remaining portion of the barrel.
Carve the interior of the drum, leaving uncarved at each rim the thickness of the insert.
Install centering jig on the inside of the barrel so that its top will be flush with the top of the barrel. Adjust the centering hole so that it is exactly centered in the opening. Fine adjustments can be made later as the cut progresses.
Make the cut on the inside of the barrel in small increments until the depth is the same as the thickness of the plywood insert and there is approximately ½” left at the top of the staves. Make the cut wide enough so that a small ledge will be left for the insert to sit on.
Drill a center hole in the insert and cut out a circle with the router and circle cutter attachment to the same size as the interior cut of the barrel.
Turn insert over and again drill a center hole. Rout out successively smaller and deeper rings with a coving bit. The size and depth of the rings will depend on the size of the drum and the final width of the insert. For a 24" drum the inner ring will be about ⅜" and the insert width will be 2".
Glue the insert into the barrel and place a ⅜" x 2” dowel through each stave, alternating between the laminated Plywood. Remove excess glue and trim dowels flush.
Gluing Staves
Attach a handle of some sort to both lids, so that the lids can be replaced during gluing.
Using a large cold or brick chisel, remove bands #1-5. Do not remove the bottom band, #6. Barrel must be on a flat surface and not moved when the bands are off.
Carefully open each stave and apply glue to both sides and as far down as possible. Do not allow the stave to pop out of the bottom band. Close the stave back to its original position and repeat for each stave. Work quickly, 2-3 people gluing at the same time, before the glue sets.
Replace bands #1-3 and the lid and tighten, hammering the bands down with the chisel.
Turn barrel over and remove bands #2-6, leaving band #1.
Repeat step #3 and then replace all bands, hammering them all down tight.
Note - Steps 3-6 must be accomplished quickly before the glue sets. If using a mixed glue, Prepare enough for all of the Staves.Remove all excess glue with wet rags.
The plug can be glued into the bung hole at this time. Try to align the grain of the plug with the grain of the stave.


Insert Shaping
If necessary level edge of barrel flush with insert.
Measure and mark ¼" in from the outside of the insert. This along with the remaining width of the staves will form the rim on which the skin sits. Make a shallow scoring cut with a V-groove bit, router and circle cutting guide around the insert at the ¼” mark.
Set the point of the V-groove bit at 2" (for a 24" drum) from the outside of the insert. Make successively deeper cuts to 1¼”. Now make successive wider and shallower cuts to form a rough bevel up to the ¼” scoring cut at the top of the insert. This bevel can be smoothed out later with a belt sander.
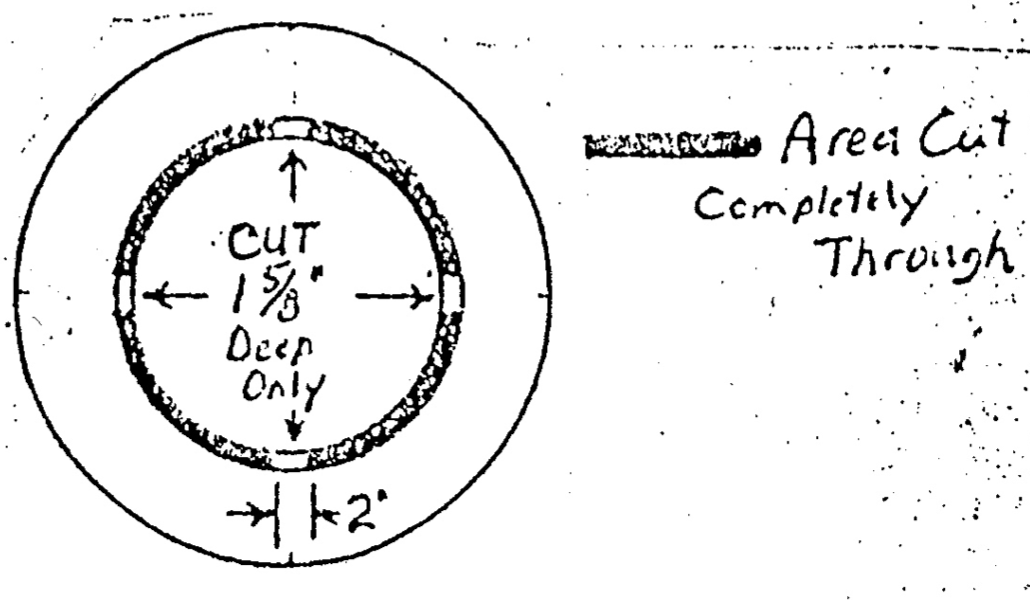
Using a long shank straight bit set to leave the 2" insert, make successively deeper cuts to a depth of 1⅝” (for a 2¼” thick insert) only, which will leave ¼” underneath uncut. Mark 4 points 1" wide - these areas are not to be cut at this time. Proceed to cut completely through the plywood, leaving the 4 marked points. This holds the center of the insert until all cuts are made.
Cut out the 4 - 1" areas of support with a jigsaw or keyhole saw.
Smooth the inside bevel of the insert and round off the rim. Do not leave any flat spots at the top of the rim, as this may cause a buzz in the head after it is installed.
Finish the outside of the drum.